Welcome to the tunnel design standards page for Highway 115. We appreciate the time you’ve taken to read through the guides and help out. Note that these technical documents are only meant for public Highway 115 infrastructure. Private access tunnels can be built with any design you prefer, so long as they abide by Highway 115 rules and guidelines. For more information, visit Connecting Your Portal.
Important Highway Notices
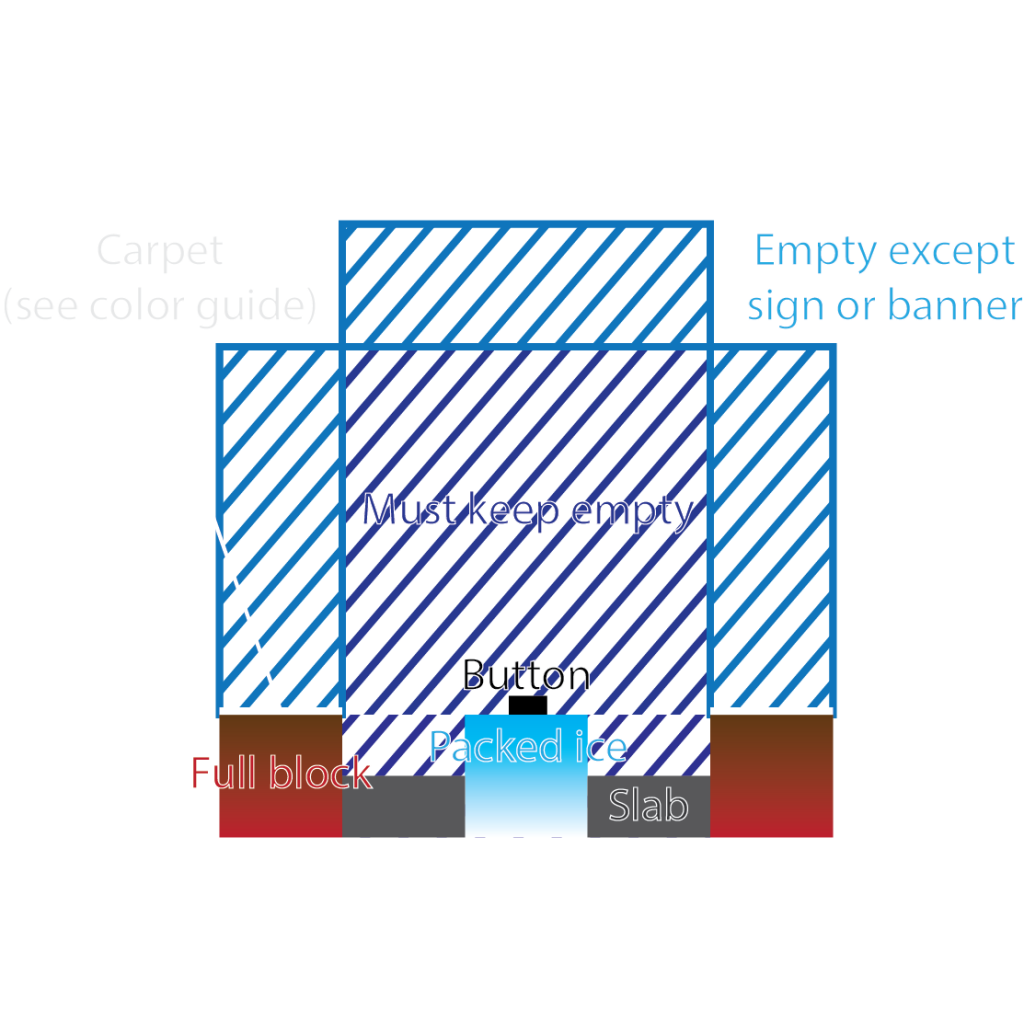
Do not remove any parts of the Highway 115 tunnel aside from the walls to access it. Objects that may not be removed include (but are not limited to) carpets, slabs, ice blocks, and buttons. You can decorate outside empty areas (labelled “Empty except signs or banners” in this diagram) with unobtrusive decorations (such as signs and banners) to make your connection more obvious. These modifications are at the Connection Consortium’s discretion and may be removed at any time.
No stores within the 100 ring road area. For season 9, as part of the community shopping district, a measure was passed to prohibit any roadside shops within the 100 ring road area. Instead, business should request a plot within the Overworld shopping district. Roadside stores are only allowed beyond the 100 ring road (more than 100 blocks in the X and/or Y direction).

5 Wide Tunnel Standard
The above diagram shows the standard tunnel design for primary 5 wide roads and highways. This is the standard to which the most important tunnels are built to. They are: main (cardinal) highways out to 500 blocks, 100 ring roads including extensions to 250, and the central 250 ring roads, excluding the extensions to 500. The tunnel will have a nearly 5 by 5 block cross-section when fully complete. Here are explanations for the diagram labels.
- “Must keep empty” – The core 3 by 3 area of the tunnel must be clear of all blocks and objects.
- “Empty except sign or banner” – These three 1 by 3 block regions of the tunnel top and sides must be clear of blocks. However, objects without collision boxes (torches, signs, banners, item frames) are permitted in this space. Ensure that they are not too visually obtrusive as they can be removed at Connection Consortium’s sole discretion.
- “Packed ice” – Within the bottom middle of 3 by 1 trench is the ice blocks. This is what makes the ice roads, ice roads. The ice blocks should be along the axis the tunnel is built for (0, 100, 250, 500, 1000). For 5 wide tunnels, packed ice should be used within the 250 ring roads and blue ice beyond.
- “Carpet (see color guide)” – These are the guardrails / curbs of the ice road. They prevent the boat from colliding with tunnel entrances and thus ensure a smooth and continuous journey. Do not remove the carpet! See the color guide below for information on what color of wool carpet to use on each highway/road.
- “Slab” – Slabs are placed on both sides of the ice block to allow people to cross the ice road without having to jump. The standard slab to use is deepslate tile slabs.
- “Button” – Buttons are placed on top of the ice block to prevent mobs from spawning. The standard button to use is polished blackstone buttons. String (to make tripwire objects) is also a possibility. Rails and pressure plates are not to be used.
- “Full block” – Underneath the carpet, there must be a block. This can be any full sized, solid block. Historically, soul soil was placed here but it is a lot of effort to get and seldom used with soul speed. Do not use soul sand.
Guardrail Color Guide

- ⬆️North: Red🟥
- ➡️East: Green🟩
- ⬇️South: Blue🟦
- ⬅️West: Yellow🟨
- For 100 ring road central sections
- Right side approaching main highway would be color of that highway
- Left side would be color of other highway in quadrant
- For 100 ring road to 250 ring road extensions
- Right side approaching main highway would be color of that highway
- Left side would be white⬜ carpet/glass pane
- For all other roads
- Same convention as 100 ring road extensions
- Right side approaching main highway would be color of that highway
- Left side would be white⬜ carpet/glass pane
- Use black⬛ carpet/glass pane where two different colors meet (at an intersection)

3 Wide Tunnel Standard
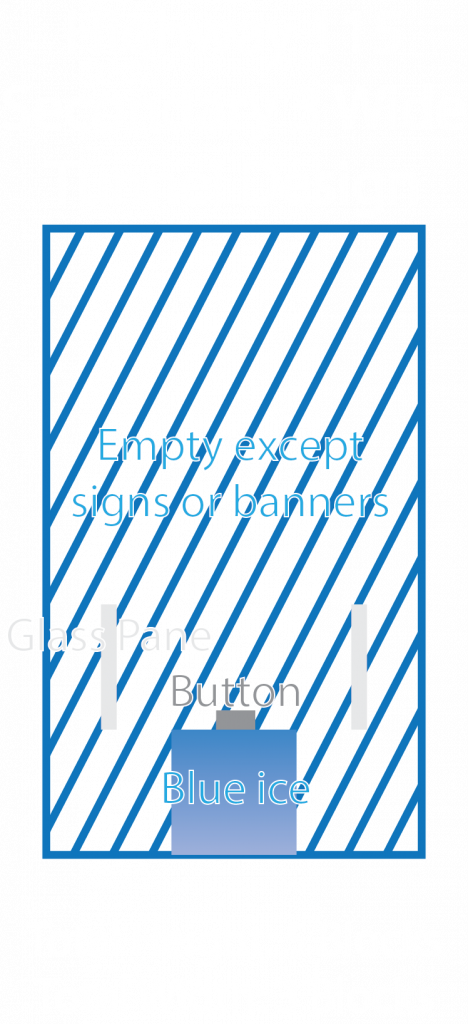
The above diagram shows the standard tunnel design for secondary 3 wide roads and highways. This is the standard to which the cardinal (main) highways beyond 500 blocks, the 250 extensions to 500, and the 500 rings roads are built to. The tunnel will have a 5 by 3 block cross-section when fully complete. Here are explanations for the diagram labels.
- “Empty except signs or banners” – The entire 5 by 3 block section must be clear of blocks. However, objects without collision boxes (torches, signs, banners, item frames) are permitted in this space. Ensure that they are not too visually obtrusive as they can be removed at Connection Authority’s discretion.
- “Blue ice” – Within the bottom middle of 3 by 1 trench is the ice blocks. This is what makes the ice roads, ice roads. The ice blocks should be along the axis the tunnel is built for (0, 100, 250, 500, 1000). For 3 wide tunnels, only blue ice should be used.
- “Button” – Buttons are placed on top of the ice block to prevent mobs from spawning. The standard button to use is polished blackstone buttons. String (to make tripwire objects) is also a possibility. Rails and pressure plates are not to be used.
- “Glass pane” – These are the guardrails / curbs of the ice road. They prevent the boat from colliding with tunnel entrances and thus ensure a smooth and continuous journey. Do not remove the glass pane! See the color guide above for what color to use for each road section.
The 3 wide tunnel standard does not specify slabs as they are unneeded in this configuration for mob-proofing.
Tunnel Changelog Relative to Season 8
5 Wide Tunnel Standard
- Adjusted sections of road that will be built to 5 wide tunnel standard
3 Wide Tunnel Standard
- None
Page Information
Last updated: December 17, 2023 at 17:56 ET
To-do:
- Add section(s) for general wayfinding details such as signage and arrows
- Add details for design competition to furnish the tunnels
- Add information about intersections
